
![[Translate to English:]](/fileadmin/_processed_/6/8/csm_M2000-shad-long-smaller_721f1235f0.jpg "[Translate to English:]")
![[Translate to English:]](/fileadmin/_processed_/3/f/csm_Titus-shad-long-smaller_1553d43f5f.jpg "[Translate to English:]")
![[Translate to English:]](/fileadmin/_processed_/6/4/csm_page-teaser-cases-1500x3000pxl_01_5d7916f355.jpg "[Translate to English:]")
![[Translate to English:]](/fileadmin/_processed_/7/f/csm_page-teaser-blog-1500x3000pxl_d26096fc1e.jpg "[Translate to English:]")
![[Translate to English:]](/fileadmin/_processed_/8/1/csm_page-teaser-service-1500x3000pxl_01_3be9f7cec6.jpg "[Translate to English:]")
![[Translate to English:]](/fileadmin/_processed_/c/1/csm_page-teaser-karriere-1500x3000pxl_f91a4c1099.jpg "[Translate to English:]")
Differences between Marking Time and Cycle Time for Direct Part Marking with Laser

There is a difference between marking time and cycle time for industrial parts marking. “Okay”, you might say. “So what? Does that matter?” The answer is simple: Yes, it does. At least, if a realistic throughput calculation matters to you. For example, in order to validate if you can meet the target output with your equipment, stay within the calculated costs per part, and plan your internal resources such as required production people correctly.
How can (laser) marking time and cycle time be defined?
To avoid confusion of these terms, let’s define first what is meant by marking time and cycle time in this article. That is important because there are many different definitions and understanding of these terms out there. Following definitions are used in this article:
- Marking time is the net time period from the beginning of the laser beam exiting the laser source to the end of marking the material.
- Cycle time is the overall time from start to end of processing your part with the machine including handling and software communication.
Given these definitions, you’ll have quickly realized that marking time is a subset of the cycle time. For this reason, using marking time as the basis for throughput calculation can be a serious mistake, when it greatly differs from the cycle time.
What are the other steps in addition to the marking process itself? How to get to cycle time?
There are various possible additional steps, such as:
- (Un-)Loading and positioning the part
- Trigger/start the laser marking process
- Opening and closing the machine door
- Loading/switching the marking job
- Refreshing the marking job, e.g. when it contains dynamic content such as a part-specific DMC
- Moving linear and rotary axes inside the machine
- Carrying out vision tasks, e.g. validating readability of a DMC
- Running (workflow) software activities, e.g. logging and writing data to an external database
How to optimize laser marking cycle time
First, you need to find out what are the most time-consuming steps in your laser marking cycle time. There are several possibilities. Let’s face just two of them:
- Loading the machine and placing the part correctly within the fixture.
- Carrying out vision tasks before and after marking.
1. Loading the machine and placing the part correctly within the fixture:
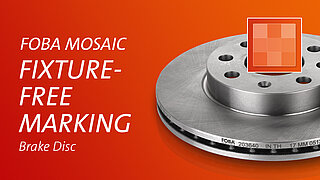
Let’s suppose, it is the process of loading the machine and placing the part correctly within the fixture. Then, a feature for fixtureless marking might help you to save time and money: Save time because you no longer need to fix parts. Save money because you no longer need costly fixtures.
A feature for fixtureless marking, like MOSAIC, addresses the key challenges of accurately aligning marks on large parts regardless of the part position and orientation. The internal camera of the laser is used to create an image of the marking field simulating a straight down camera view. The straight down view eliminates the side view distortion typically created when using an external camera and enables the system to accurately mark parts regardless of their placement.
Parts can be placed loosely in the marking field without any fixture. Marks will be aligned and marked perfectly. Learn more in the video:
2. Carrying out vision tasks before and after marking:
Maybe the most time-consuming step of your cycle time is carrying out vision tasks before and after marking.
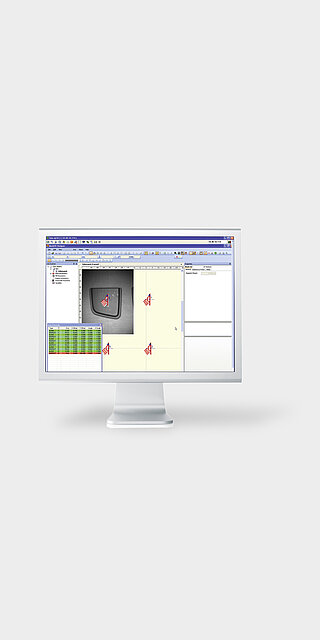
Before marking, the part identity has to be validated to prevent that the wrong part is marked and the content has to be correctly aligned to the part to guarantee readability. Furthermore, traceability codes often have to be validated after marking to make sure that they meet the strict quality requirements. Code grading processes guarantee the traceability of the applied mark throughout the assembly process and the lifetime of the product. These vision tasks can be time-consuming. This is where a laser-integrated vision system comes into play to help saving time:
Laser-integrated validation tools validate the part identity and automatically align the content to the part before marking. In addition to the advantage of saving time, this process is less error-prone compared to when this is done by an operator.
For validation after marking, an integrated vision system offers advantages over an external (stand-alone) validation: The ability to validate a traceability code or any other content right after the part has been marked, without the need for an operator to handle the part, eliminates extra handling that directly affects cycle time. The validation process consists not only in grading the 2D code, but also in validating its unique content, something that would not have been possible on a remote station without adding a tracking process and networked devices. Additional third-party hardware or a separate inspection process for the verification and reliability of the marking process is thus not needed. Integrated vision systems like IMP (Intelligent Mark Positioning) support such an efficient and reliable, closed-loop laser marking process so that marks are applied and validated with one system both efficiently and reliably. Watch the video to see the laser marking process:

As you have seen, a laser-integrated vision system and a feature for fixtureless marking can have a positive impact on your cycle time and, additionally, offer even more advantages.
How to get more information about the cycle time when planning to purchase a laser marking machine?
If cycle time is relevant for you, you should ask your laser supplier for consulting you regarding measured or estimated times for the various steps that are relevant for your specific process. Do not hesitate to ask your supplier for support!
![[Translate to English:]](/fileadmin/_processed_/f/d/csm_page-teaser-mosaic3-1500x3000pxl_01_f1ce2b3f3d.jpg "[Translate to English:]")
![[Translate to English:]](/fileadmin/_processed_/a/9/csm_page-teaser-HELP-1500x3000pxl_bed4000f22.jpg "[Translate to English:]")